EXPERIMENTS WITH TAPERED PIPES
BY DAVID B. WEEMS
Speaker Builder 2/87
If you run into trouble, use
the line as a dog house and design either a closed box or reflex enclosure for
your woofer. For champions of transmission lines who are disturbed by those
frivolous words, here is a peace pipe. Or, to be more specific, a tapered pipe,
like the labyrinth, the tapered pipe makes use of quarter-wave loading. Unlike
the labyrinth, the driver is placed some distance from the end of the pipe.
Tapered pipes were popular in
Britain years ago, but except for a small amount of damping material behind the
driver, they were bare-walled. In fact, the de-signer of one 1960s pipe
enclosure said damping material in the pipe would spoil the performance?
The stuffed tapered pipe is an alter-native to those designs. Voigt was the first to use the "stopped" pipe, which is similar in action to an organ pipe. In 1949, Ralph West developed the Decca comer speaker. Both systems had relatively small drivers.
THEORY.
The principle behind the pipe is shown in Figure1
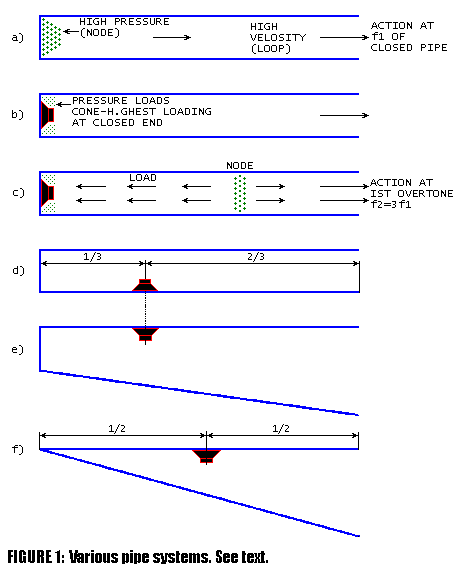
The sketch in Fig. la shows relative pressure and velocity in a
closed pipe at resonance. Pres-sure points occur at nodes, high velocity points
at loops. If you mount a speaker at the closed end of the pipe it will be loaded by the high pressure at that end, greatly
increasing efficiency. Two problems hinder this arrangement. First, the pipe's
fundamental frequency is so strongly favored, low frequency performance can
sound like one-note bass. Another disadvantage is odd harmonics production. The
first harmonic is the most serious, occurring at three times the fundamental's
frequency Fig1c. To connect it, place the driver at one-third the distance from
the pipe's stopped end Fig1d. At that point, the pressure will become somewhat lower than at
the closed end, but still high enough to provide good loading at the
fundamental. At the first harmonic frequency, the drive point occurs at a loop
instead of a node, and output will be reduced.
Voigt tapered the pipe to reduce the
one-note effect and to spread the resonance over a band of frequencies Fig1e. In later versions, the throat area was reduced to zero for
smoother response and the driver installed at the midpoint of the line Fig1f. More about that later,
The English builders of a generation
ago designed their pipes for a single-cone 8" driver. Total cost of a driver and
enclosure for one popular model was about L5, or at the rate of exchange in
those days, about $14. The speaker fired upward at the rear wall so the highs
dispersed around the room at a subdued level. In an attempt to restore the lost
Overtones, listeners applied treble boost. Some thought the arrangement's high
frequency reproduction was inadequate. One asked, "Who put the blanket over the
cymbals?'' The problem of highs lost in the reflection process was com-pounded
by the voice coil inductance in the single-cone speaker.
British builders almost always used
3/8" plywood to construct their pipes. Thick walls were unnecessary, they said,
be-cause their enclosures were stiffest at the point of greatest pressure. Some
suggested using a slight degree of wall flexure because it would increase
acoustic coupling near the fundamental frequency and damp air column resonances.
Such statements, however, made pipe design seem more like magic or luck than
science. Everyone seemed to agree on the necessity for tight joints. One author
said a 1/14" gap in the driver mounting would reduce the output at 35Hz by a
factor of four.
About five years ago, after having
ignored pipes because of their resemblance to the infamous "air coupler" of
early US hi-fi days, I built a pipe for a dual cone 6" x 9" car driver featuring
a 10 oz. magnet and foam suspension. The $7 speaker had an amazing bass response
in the pipe, but it also had some obvious peaks, the worst of which occurred at
95Hz and 220 Hz. The 220Hz peak was probably caused by the second harmonic,
which arises at five times the pipe's fundamental frequency. A driver with a
heavier magnet gave much smoother response in the 95Hz region, but showed no
improvement in the higher resonance. I considered attacking the 220Hz problem
with a Helmholtz resonator designed to absorb energy at that frequency, but
other endeavors interrupted my plan.
Recently, while digging through abandoned projects in my shop, I discovered the old pipes and wondered how the principle would work with better drivers and with damping material in the line. To save time and material, I decided to make a miniature pipe for a 4" woofer, the Radio Shack #40-1022. I knew 1 could later apply my experience to larger systems, but first, I had to design the enclosure.
 PIPE DESIGN
. To design a tapered pipe system, you must
choose appropriate dimensions for pipe length, throat and mouth area, and drive
point. The fundamental frequency is almost totally set by one parameter—the
total line length. The formula given for a labyrinth or pipe length
is:
PIPE DESIGN
. To design a tapered pipe system, you must
choose appropriate dimensions for pipe length, throat and mouth area, and drive
point. The fundamental frequency is almost totally set by one parameter—the
total line length. The formula given for a labyrinth or pipe length
is:
|
|
where l
is the length of pipe,
Ń
is the speed of sound in air,
f is the pipe's fundamental
frequency, and r is
the pipe's radius or equivalent radius. This formula, however, produces a longer
than necessary pipe length. Opposing factors are at work here because tapering
the pipe tends to raise the fundamental frequency, but folding and choking the
mouth at the port lowers it. A bare pipe will usually perform as though it were
about 30% longer than its measured length, and when you add damping material, it
can seem even longer. As a rough estimate, expect the required length to be
about 65% of the calculated length. The pipe's cross sectional area will very
from near zero to zero, to a maximum of about 2.5 times that of the driver's
effective piston area. The pipe area should be about equal to the cone's 'area
at the drive point, but ±20% is acceptable. The port area is typically equal to
the cone area, or about 0.4 that of the maximum area.
Taper rate is one aspect of the
tapered pipe that varies with driver size. A 4" woofer requires less than a
third of the pipe area needed by a 9" driver. If a pipe for a 4" woofer WAS
designed to have the same taper rate as that for the larger speaker, its total
length would be 20". Even if it "acted" like a 30" pipe, the fundamental
frequency would be about 100Hz. That is too high, even for a 4" woofer. You can
neglect taper rate as a design factor for small drivers, but a low taper rate
may demand more stuffing. If you wish to experiment with bare pipes, use an 8"
driver.
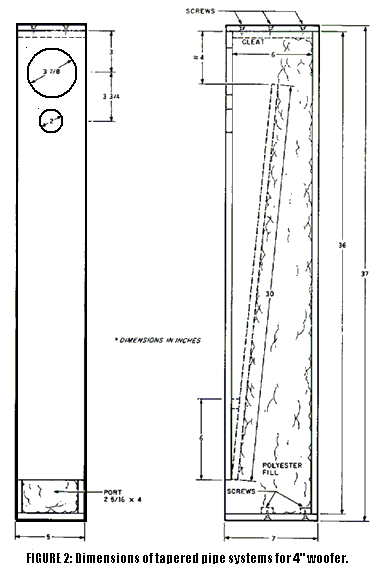
I
made a quick guess at the proper length by setting the enclosure height at 3',
which placed the drivers close to ear level. Unlike the British designs, I
decided to mount the drivers in the conventional way, on the enclosure's front.
Tî complement the Radio Shack woofer, I used a
Radio Shack 3/4" tweeter (#40-1376). The crossover for this simple sys-tem is
nothing more than the high-pass capacitor that comes with the tweeter, An L-pad
adjusted the tweeter level to match the woofer's rather inefficient level,
Unlike conventional systems, how-ever, I placed the tweeter below the woofer, a
move which made more of an effect that I expected.
After drawing a rough design sketch,
I noticed the drive point would be some-what short of the mid-point from the
throat to the mouth. You can only estimate the pipe length; the true acoustical
length may be different from that estimate. The formula for optimum drive point
distance from the throat is:
|
|
where
d is the drive point distance from
the throat, l
>is the pipe length,
At is the throat's cross-sectional
area, and Am is the
mouth's cross-sectional area.
The mouth is defined as the port
area. The maximum area is that of the section just before the port. As you can
see from the above formula, d can vary from one-third where the area of the
throat is equal to that of the mouth, to one-half where the pipe tapers to zero
throat area. Again, unless you use a straight pipe, you can only estimate the
drive point's optimum location.
After doing some arithmetic, I found
that by starting the throat at a point 6" above the mouth and using an initial
area of 2" the pipe would approximate the formula for the drive point. The
maximum area would be 24", 2 which would be choked to 9.25"2 at the mouth.
My
final decision concerned the building material's type and thickness. For such a
small pipe, Vi" plywood seemed adequate. But, because 1 had a supply of
Óç" material and because using 1/4" plywood
seemed like heresy, I opted for the thicker walls. If you wish to try a pipe
system without damping material, try a thinner material. Here is a quick summary
of my construction methods, should you choose to follow them:
1.Cut out the parts and prepare to
attach the partition to the sides with glue and nails.
2.To place the partition precisely,
first set it in place on the inner surface of each side and mark an outline around it.
Then, drill guide holes for nails down the center line of that outline.
3.After reversing the side, drive a
nail into the partition through a hole at each end of the line of holes, just
far enough to temporarily hold the partition.
4.Remove the side and spread glue on
the matching surfaces. When you do the final nailing, the pre-nailed holes will
ensure the parts don't slip out of place as you drive down the other nails.
5.After the glue sets, caulk the
joints and install the front and back panels with silicone rubber sealer and
nails. The sealer prevents air leaks on the joints you can't reach during
internal caulking.
6.To make the top and bottom
removable, install cleats inside the pipe to receive screws.
7.Gasket any removable parts with foam weather stripping or other sealer.
TEST RESULTS.
In Figure 3, the impedance curve of the 4" woofer in a bare pipe looks similar
to the same model woofer in a reflex. As 1 discovered later, the woofers behaved
significantly differently in some tests. Some writers call the impedance peaks
in tapered pipes "resonances," but Bal dock claims the term resonance isn't
appropriate because a reactive component is present. When I ran an oscilloscope
test on bare pipes, the ellipse closed to a straight line at the peaks and
valleys of the impedance curves. After I added damping material, the ellipses
remained open. The lower peak was likely produced by cone loading from the air
in the pipe, while the upper one was likely caused by enclosed air stiffness
behind the cone.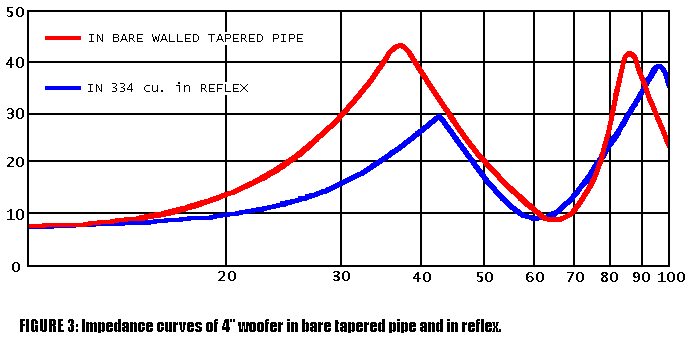
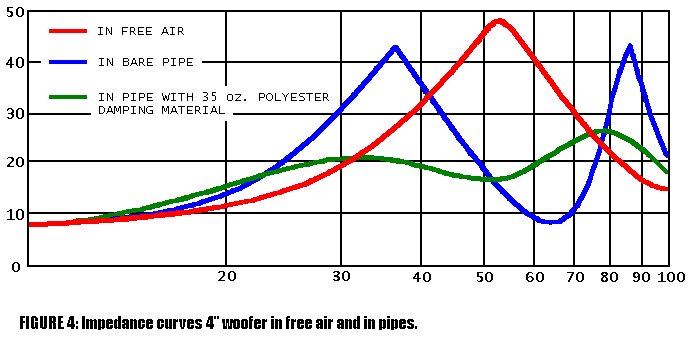
If you analyze the curves for the
woofer in free air and in the pipe, you'll see the lower peak in the pipe occurs
at about 37.5Hz, whereas in free air, the single peak is at 53Hz or 1.41 times
that of the pipe. This ratio tells you the air load mass in the pipe is
approximately equal to the mass of the cone itself.
On listening tests, the bare pipe
produced a hollow, ringing sound, particularly on male voices. When 1 conducted
a rough frequency test, significant peaks and valleys occurred in the region
below 500Hz. So, I lined the pipe area behind the woofer with a 1" layer of
acoustical fiberglass on the sides, back, and under the top of the enclosure. I
then noticed some improvement in the listening tests, and a considerable
difference in the 200-500 Hz frequency response test.
I added loose wads of polyester
batting to the pipe, placing 1/4 oz. in the throat, filling the space behind the
woofer, and then gradually increasing the amount in the large section of the
pipe. With each addition, I monitored the progress with impedance and listening
tests.
You can stuff the pipe until the
impedance curve shows a single peak, like that of a closed box speaker. The peak
frequency, however, will be lower in the pipe than in a closed box. In my case,
the single peak occurred at 60Hz. After stuffing and restuffing, I arrived at
what seemed to be a good compromise between under and overstuffing: a total of 3
1/2 oz. of batting. My pipes internal volume is 0.5 ft, not including the volume
occupied by drivers, partitions and cleats. Therefore, the rate of fill is
probably about 8 oz. per cubic foot. The impedance curve for that condition is
shown in Figure 4 ,
I
then conducted near field microphone tests, which showed the three systems
performed similarly in the 80-100
>Íă range.
Listening trials, however, told me a different story about bass range
perception. The closed box speaker was clearly more limited in low frequency
response. (Near field technique doesn't register the output of ports removed
some distance from the woofer.)When listeners compared the reflex with the pipe,
most initially thought the reflex had a bit more bass than the pipe. After
longer and more careful listening, however, their conviction waned be-cause the
pipe speaker performed better on the lowest frequencies. Frequency response
tests confirmed this conclusion. The reflex had slightly more output in the
70-100Hz range, while the pipe was clearly superior below 60Hz.
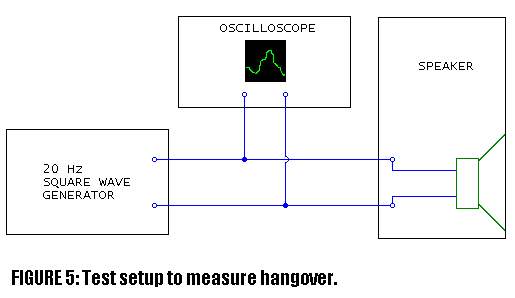
An interesting way to compare
speaker performance is to feed a 20Hz square wave to the speakers and observe
the patterns produced on an oscilloscope. This simple test setup is shown in Figure 5
.
The pattern will alter according to
the resonance frequency of your speaker and its degree of damping. The lower the
resonance frequency, the fewer the number of oscillations that will show on the
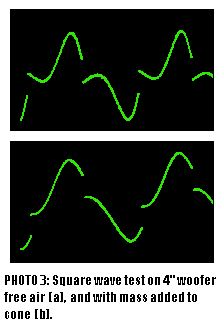
trace. The oscillations' amplitude, however, will also vary. I used this method
to test four identical woofer models: one in free air, then again in free air
with a blob of modeling clay [whose mass was equal to the cone's mass) stuck to
the cone; and three other woofers in the three types of enclosures I mentioned
earlier, Before you examine my various pat-tern photographs, be aware my
oscilloscope exhibits considerable droop when it is fed a 20Hz square wave. That
droop may be caused by a too small coupling capacitor, but whatever the reason,
it is constant. If your instrument's controls are unchanged during the tests of
various speakers, consider the comparisons valid.
The pattern in Photo 3a
and Photo3b indicate, as expected, the driver cone moves farther in
free air than when installed in an enclosure. Little change occurred in the two
free air tests, except for the lower resonance frequency in the one 1 con-ducted
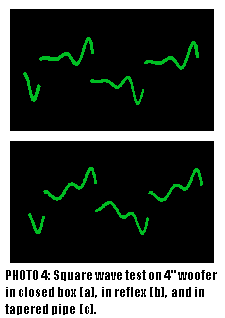
after 1 added mass to the cone. The trace for the closed box woofer Photo 4a
shows decreasing oscillation amplitude, but the reflex's trace photo4b indicates little amplitude change. The pipe speaker Fig4c shows a single pulse movement, about half a sine wave, then very little hangover. I took Photo4c after I added damping material to the pipe, but the woofer in the
bare pipe's trace was almost identical except for a small deflection at tail's
end.
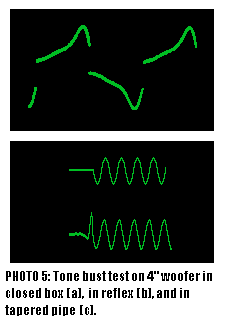
To test the woofers in the three
kinds of enclosures, I fed each a 55Hz sine wave signal from an audio generator
through a tone burst generator and an amplifier Photo 5. In fairness to the reflex speaker, it had no more
over-shoot than the pipe speaker at frequencies above 80Hz, and only slightly
more at 70Hz. The pipe speaker was at least equal to the others at all
frequencies, except at 180Hz where it showed a bit more hangover.
After reviewing the experiments with the A" woofer, I decided the tapered pipe system deserved further testing with a larger woofer. With that in mind, I began to work on a pipe designed around the Peerless TP165F.
SECOND DESIGN.
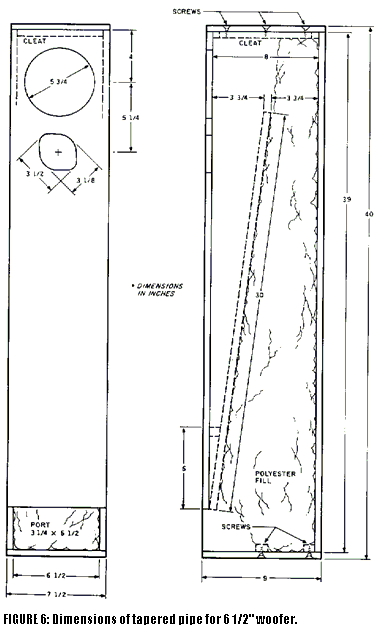
Peerless lists the TP165F's effective piston area at 12.45 x 10⁻³
square meters, or about 20 in. I made the internal dimensions 6 1/2" x 8",
putting the pipe's theoretical maximum area at 52 in. By using 1/2" material,
the minimums outside dimensions are 7 1/2" x 9." Because pipes are so compact,
they occupy very little floor space and yet do not require stands. On most floor
surfaces, however, you may wish to enlarge the bottom board to add stability to
the tower. Extend the board beyond the en-closure's front to counter gravity's
pull on the front-mounted drivers.
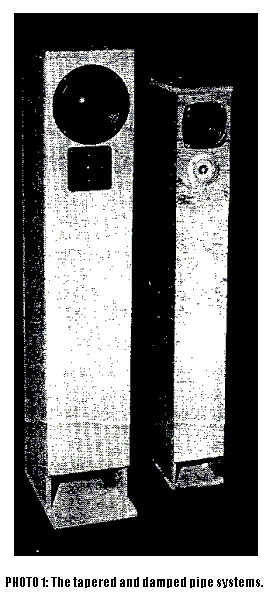
For easy pipe construction, place
the tweeter below the woofer, as shown in Photo 1.
I
increased the larger pipe's length in an attempt to extend the bass range.
Except for loading the driver to a lower frequency, however, I doubt whether it
made much improvement. Again, I had to do some arithmetic to estimate the
optimum drive point. My figures indicated I should begin the throat about 6"
above the mouth, with an initial area of slightly under 5 in. You can do this by
gluing ŕ 3/4" strip across the front of the
partition, at the point where it will make con-tact with the rear of the front
panel. I ran the usual tests with various amounts of damping material and
settled on a lighter optimum packing density than I had used on the smaller
pipe. The final amount was a square foot of 1" fiberglass on the surfaces behind
the woofer, an ounce of polyester batting in the throat, and 5 oz. in the
remainder of the pipe. Although the density was lower than for the smaller pipe,
the impedance curve was similar Figure 7.
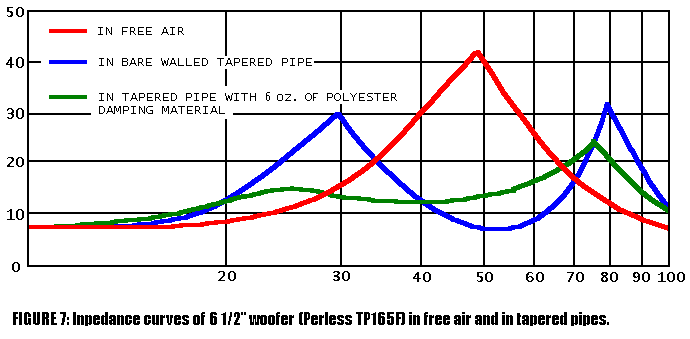
The larger system's bass performance was promising from the start,
but something about the sound wasn't right. At first, I was tempted to blame the
tweeter, a German-made MBM25S I obtained from McGee Radio, but later tests
proved me wrong. As it turned out, I had several problems, some of which
involved the crossover network.
EVOLUTION OF A CROSSOVER.
My first crossover network choice was a
second-order APC (all-pass crossover) described by Bullock/ My enclosure design
had placed the woofer-tweeter center-to-center distance at 5 1/4", so I planned
to put the crossover frequency below the point where that distance was equal to
a wavelength, or under 2.6kHz. With that in mind, I chose a crossover frequency
of 2.2kHz.
At first, the system sounded loud—an
ominous symptom. The problem turned out to be a rise in output between
800Hz-1.8kHz, so I made a filter to smooth the woofer's response in that range.
The filter transformed the sound, helping the speaker to wear well in long
listening sessions. But one abnormality remained: the vertical response was not
uniform when I stood in the sound field and then sat down. Even people who liked
the anomaly mentioned it. ''It sounds sweeter when you sit down," one person
remarked.
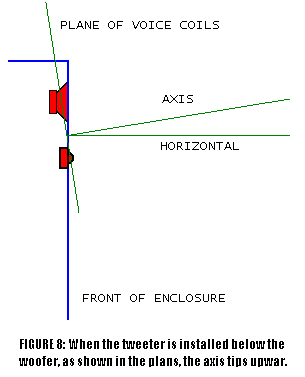
When I checked the frequency
response at various elevations, I found a null in the 2.6kHz region at ear level
while listening from across the room. I realized that when I placed the tweeter
below the woofer, it tipped the axis up-ward Figure 8.
At standing ear level, the null was replaced by a smooth
response. Surely, the crossover network was involved, but the problem was caused
by a combination of factors that made the woofer's realized roll off rate
different than that predicted by the second-order filter.
I measured each driver's response,
substituting a resistor in the crossover network for the muted driver, In the
2-3kHz band, the woofer's and tweeter's output were equal.
I had several solutions to choose
from. An obvious one was to use a higher order crossover. Having already made up
a set of crossover networks, I tried to salvage them with notch filters, tuned
to 3kHz, in the woofer circuit. The first filter, made with a 0.25mH coil and an
11mF capacitor, did not provide enough cut. So, I made up another set, using 1mH
coils and 3mF capacitors. They solved the problem, but I wondered whether a
simpler method could give me an acceptable performance.
Throughout the tests, I tried nearly every option, including reversed driver polarities. Finally, a single, larger-than-normal inductance in the woofer circuit offered promise. So, I reduced the crossover frequency to 2kHz and made up a third-order filter for the tweeter. When you. consider the woofer's impedance with the Zobel in its circuit is about 6 Om, the calculated value for a single inductance is about 0.48mH. Instead of deriving the value from calculations, I set up the speaker outdoors on a quiet day and ran microphone tests with various values of inductance. The one that produced the flattest curve turned out to be l mH, more than twice the indicated value, This, however, is not a rare conclusion.
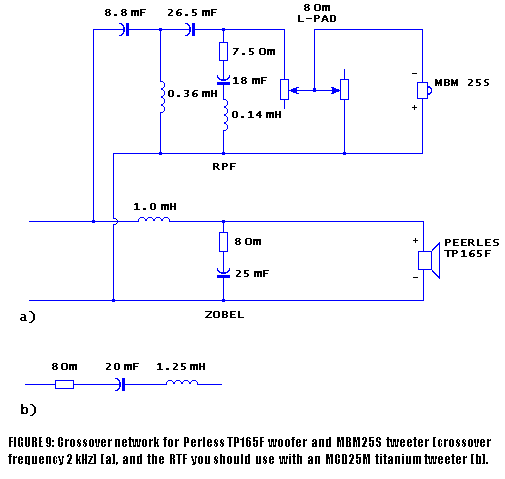
RESONANT PEAK FILTERS. The MBM25S gave a good performance, but
I found it had one peculiar trait. Even with a third-order network, a
consider-able output from the tweeter occurred at 1.1kHz—its resonance
frequency. The obvious fix seemed to be a resonant peak filter. The Loudspeaker
Design Cookbook (LDC) lists the following formula for resonant peak
filters;
Ń = 1/15.2 f
L = 1/39.48 f2C
R = approximate rated driver
impedance.
Filters produced by this formula are
effective in removing the peak, but they can also effect a lower than desired
impedance in the octave above resonance. In those cases, you need a higher Q. A
formula that usually works well is:
Ń = l/50f
You can compute the other values from the LDC
formulas. If possible, choose the final values by experimenting. I used the
formula above to make up the RPFs (resonant peak filters) suggested in the
crossover diagram Figure9. You will need a different RFF for the MCD25M, the more expensive titanium tweeter made by the
MBM25S's German manufacturer. For either tweeter model, the combined impedance
of the RPF, L-pad and tweeter is about 6 Om
, so the same crossover
values will work on both. While the wiring diagram shows re-versed polarities
for the drivers, putting the drivers in phase will make for a slightly more
uniform response at crossover. Unfortunately, it also raises the level a bit at
1.8kHz. Going back to the re-versed condition will shift the boost up-ward on
the axis, leaving a slight dip at crossover at ear level when you're listening
while sitting. Unlike the earlier problem, however, the dip is too shallow to be
noticed by most listeners. Another solution is to move the tweeter to a position
on top of the enclosure. A small baffle here should give you improved horizontal
distribution.
The tapered pipe, with its low cost
and construction ease, should be a contender in the enclosure race. It does
require a bit more tinkering with damping material than a simple box, but
challenge is part of the game.
The damped pipe has several
advantages over the bare pipe, including one that might not be obvious. In 1963,
Alan Lovell, news editor of the British magazine The Tape Recorder, heard
unusual noises coming from one of his tapered pipe enclosures. After analyzing
the sound, he found his cat had crawled in-to the pipe and was stuck. He called
and called, the cat howled and howled, but it didn't move. Mr. Lovell had to
take his enclosure apart to get the cat out. Another builder reported the first
time his cat saw a tapered pipe, it went right into it.
As a result of these incidents,
warnings were issued for builders to place screens over their pipes' ports. So,
if you run into trouble, don't expect to use the discarded pipe as a cat
residence. But, if you know anyone who has a pet snake...